ASP.NET Auto complete textbox using AJAX JSON
In this article i will show you how to implement autocomplete text box using JQERYUI ASP.NET , and Web Service .
First you need to download some Images of country flag as per your requirement from internet .
Step 1 : Then do following things in SQL Server :
CREATE DATABASE jQueryDemo

USE jQueryDemo

CREATE TABLE [dbo].[jQueryDemo_1] (
    [Id]          INT            IDENTITY (1, 1) NOT NULL,
    [CountryName] NVARCHAR (50)  NOT NULL,
    [IconPath]    NVARCHAR (MAX) NOT NULL,
    PRIMARY KEY CLUSTERED ([Id] ASC)
);

CREATE procedure [dbo].[spGetCountriesDetailsWithIcons]
@term nvarchar(max)
as
begin
 select * from jQueryDemo_1 where CountryName like @term + '%'
end
- And then add appropriate data as per your choice .
Step 2 : Create empty project [ ASP.NET Empty Website ]
Step 3 : Now create folder inside root directory named "Icons" , and make sure given name should be same throughout the project .
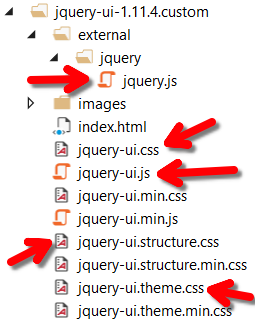
Step 4 : Now Download JqueryUI Autocomplete widget from official website , and put it inside root directory with proper name specification as shown below .
Step 5 : Now add class file Country.cs as shown below
namespace jQueryUIAutocompleteWithIcons
{
    public class Countries
    {
        public int Id { get; set; }
        public string CountryName { get; set; }
        public string IconPath { get; set; }
    }
}
Step 6 : Add connection String inside Web.config file
<?xml version="1.0" encoding="utf-8"?>
<configuration>
  <system.web>
    <compilation debug="true" targetFramework="4.5" />
    <httpRuntime targetFramework="4.5" />
  </system.web>
  <connectionStrings>
    <add connectionString="Data Source=.; Database=jQueryDemo; Integrated Security=True" name="DBCS" providerName="System.Data.SqlClient"/>
  </connectionStrings>
</configuration>
Step 7 : Now add web service with any given name by you
Step 8 : Code should be like this
using System;
using System.Collections.Generic;
using System.Configuration;
using System.Data;
using System.Data.SqlClient;
using System.Web.Script.Serialization;
using System.Web.Services;

namespace jQueryUIAutocompleteWithIcons
{
    [WebService(Namespace = "http://tempuri.org/")]
    [WebServiceBinding(ConformsTo = WsiProfiles.BasicProfile1_1)]
    [System.ComponentModel.ToolboxItem(false)]
    [System.Web.Script.Services.ScriptService]
    public class CountriesService : System.Web.Services.WebService
    {
        [WebMethod]
        public void GetCountriesDetails(string term)
        {
            string CS = ConfigurationManager.ConnectionStrings["DBCS"].ConnectionString;

            List<Countries> countries = new List<Countries>();

            using (SqlConnection con = new SqlConnection(CS))
            {
                SqlCommand cmd = new SqlCommand("spGetCountriesDetailsWithIcons", con);
                cmd.CommandType = CommandType.StoredProcedure;
                cmd.Parameters.AddWithValue("@term", term);
                con.Open();
                SqlDataReader dr = cmd.ExecuteReader();
                while (dr.Read())
                {
                    Countries country = new Countries();
                    country.Id = Convert.ToInt32(dr["Id"]);
                    country.CountryName = dr["CountryName"].ToString();
                    country.IconPath = dr["IconPath"].ToString();
                    countries.Add(country);
                }
            }
            JavaScriptSerializer JS = new JavaScriptSerializer();
            Context.Response.Write(JS.Serialize(countries));
        }
    }
}
Step 9 : Now add another Webform file inside project and should add like as folow
Step 10 : Now add following code inside Demo.aspx page
<%@ Page Language="C#" AutoEventWireup="true" CodeBehind="Demo.aspx.cs" Inherits="jQueryUIAutocompleteWithIcons.Demo" %>

<!DOCTYPE html>

<html xmlns="http://www.w3.org/1999/xhtml">
<head runat="server">
    <script src="jquery-ui-1.11.4.custom/external/jquery/jquery.js"></script>
    <script src="jquery-ui-1.11.4.custom/jquery-ui.js"></script>
    <link href="jquery-ui-1.11.4.custom/jquery-ui.css" rel="stylesheet" />
    <link href="jquery-ui-1.11.4.custom/jquery-ui.theme.css" rel="stylesheet" />
    <link href="jquery-ui-1.11.4.custom/jquery-ui.structure.css" rel="stylesheet" />
    <title>jQueryUI Demo</title>
    <script type="text/javascript">
        $(document).ready(function () {
            $("#countryInput").autocomplete({
                minLength: 1,
                source: function (request, response) {
                    $.ajax({
                        url: "CountriesService.asmx/GetCountriesDetails",
                        method: "post",
                        data: { term: request.term },
                        dataType: "json",
                        success: function (data) {
                            response(data);
                        },
                        error: function (err) {
                            alert(err);
                        }
                    });
                },
                focus: updateTextbox,
                select: updateTextbox
            }).autocomplete("instance")._renderItem = function (ul, item) {
                return $("<li>")
                    .append("<img class='imageClass' src=" + item.IconPath + " alt=" + item.CountryName + "/>")
                    .append('<a>' + item.CountryName + '</a>')
                    .appendTo(ul);
            };
            function updateTextbox(event, ui) {
                $(this).val(ui.item.CountryName);
                return false;
            }
        });
    </script>
    <style type="text/css">
        .imageClass {
            width: 16px;
            height: 16px;
            padding-right: 4px;
        }
    </style>
</head>
<body>
    <form id="form1" runat="server">
        Enter Country Name :
            <input type="text" id="countryInput" />
    </form>
</body>
</html>
Step 11 : Now Press CTRL + F5 , and you will see a magic what you have done
Thanks for reading my article
You can find my another article here :
SQL Optimization Tips
SQL : Types of JOIN
tutorial step by step,asp.net mvc5 tutorial for beginners,asp.net mvc4 tutorial for beginners,asp.net mvc3 tutorial for beginners, asp.net mvc4 razor,asp.net mvc recipes,asp.net mvc tips, asp.net mvc


